Content:
INTRODUCTION ...IMX174, what's in the box, computers,
general.
DESCRIPTION ........File size, buffering, lost frames,
starting points.
IN MORE DETAIL...Installation and brief description
of settings and controls in SharpCap, Calibration
SUMMARY............. How good is it?
FURTHER READ.....links and notes
INTRODUCTION
Recording asteroid occultations of stars by video provides timing data
to planetary observers and astrophysicist interested in the position
and shape of these objects, some are very distant in the solar system.
Two UT measurements, the START and END, can be obtained with a telescope
in the back garden using the QHY174-GPS. The accuracy of timing is often
much better than any measurement of the asteroid itself by large telescopes.
The so called "gold standard" for occultation timing in amateur
hands, is an 8-bit analogue video with frames which are time stamped
by a video time inserter controlled by GPS (GPS-VTI).
The QHY174m-GPS has become a digital (CMOS) standard, overcoming
difficulties when using the Windows operating system clock for accurate
timing. This camera (marketed in 2018-19) takes time from GPS satellites,
using a received in the camera . SharpCap software is needed. Read on...
Beyond limits.
There is a desire to go beyond the limits of analogue video,
to record in 12/16-bit depth and higher frame rates for some observations.
The QHY174-GPS offers these facilities. ( Most small chip CMOS camera
will work if the facility for accurate time is provided by the user
)
QHY174
The Sony Pregius IMX174
CMOS chip is available in USB3 deep sky imagers. The low read noise
is one characteristic, and IMX174 is of global shutter readout
type, with 5.86x5.86 um pixels and Area of Interest (AOI) control. A
good combination of features suitable for timing astronomical events
up to 400 fps. The camera control is provided by SharpCap 4.1 software,
and QHY provide their camera with an optional in-camera GPS receiver
including external antenna.
Since the availability of the QHY174-GPS in 2019, some advanced amateurs
have started developing similar technology: https://groups.io/g/d-vti-cam
. Kits of parts are expected to be produced, lowering the overall cost
and future-proofing the technology.
USING the QHY174-GPS
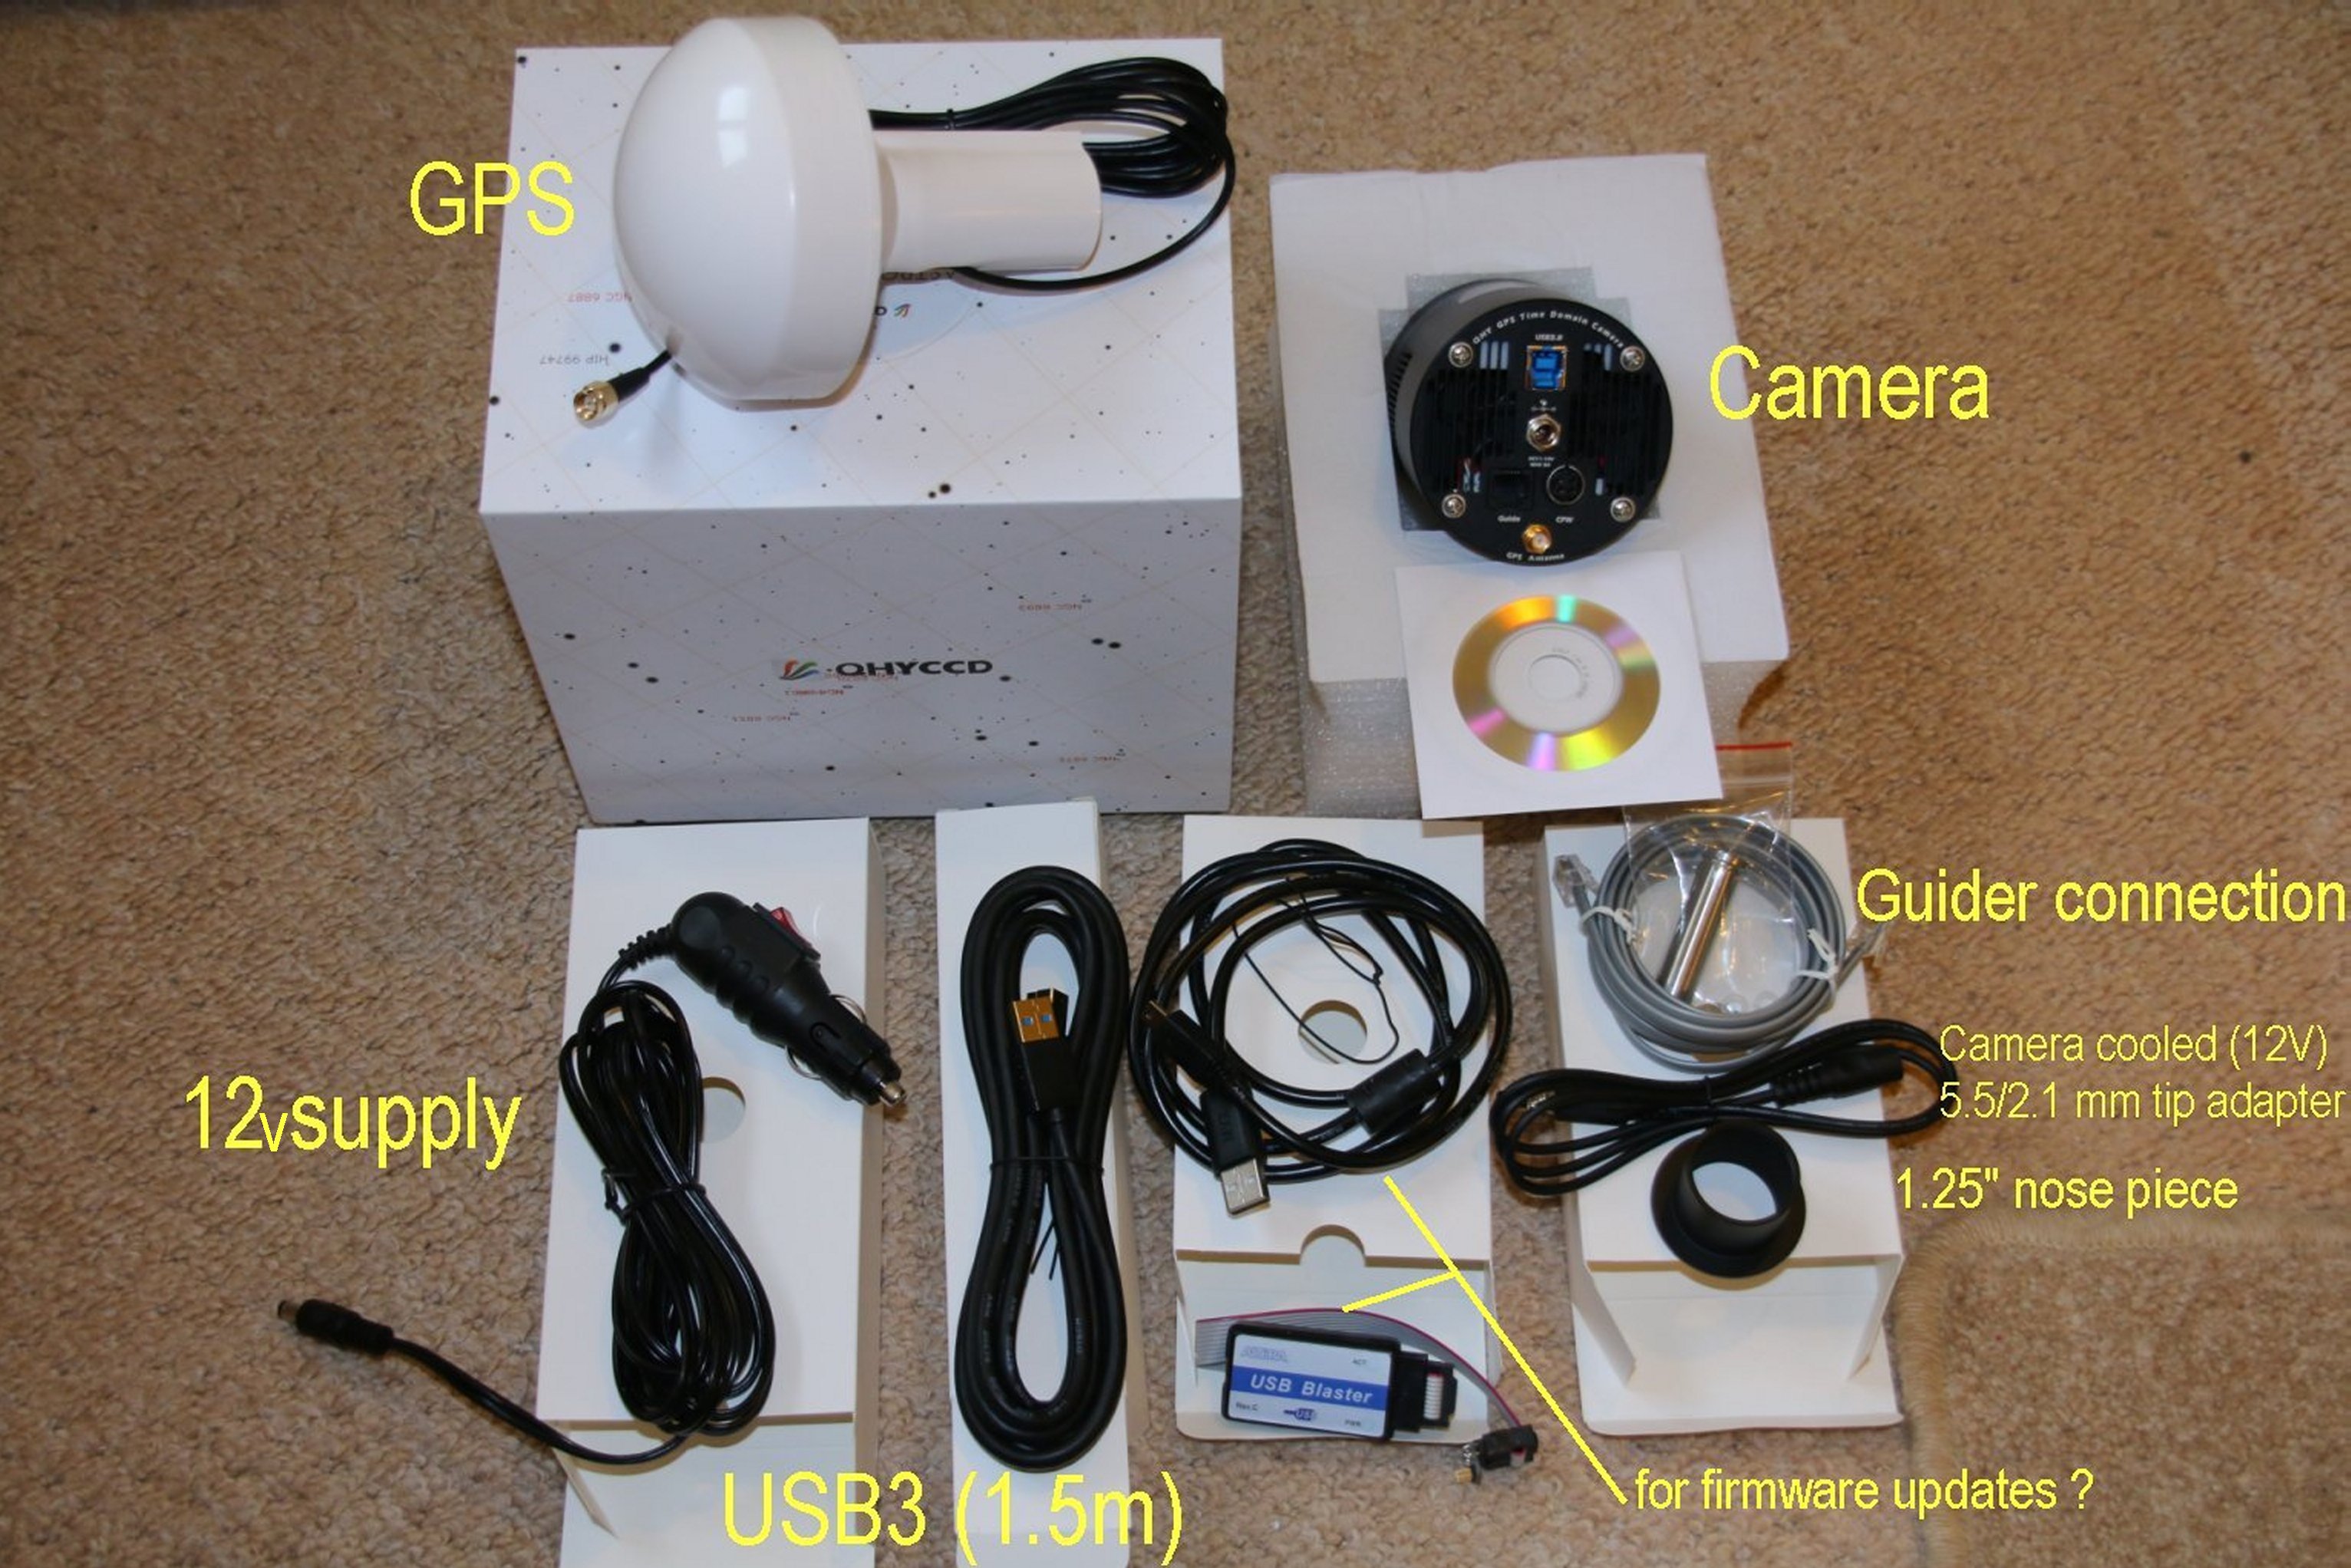
My camera was received on Jan 8th, 2020. What's in the box
?
The very nice bits (all nice) are the T2-1.25"
adapter with felt flocking, the GPS antenna which will fit on top of
a stick, and the 4pin adapter for 12V with to 5.5/2.1 mm socket. This
can be connected to a AC-DC transformer to power the cooler, or connected
to the 12v cable.
Note: the supplied USB3 data cable is 1.5m in length. I have since bought
an active USB3 extension (3m) which works fine when connected to 1.5m.
This gives me a long enough data cable.
Computer system used with this camera:
I use W7, i3 (4Gb RAM) with hybrid drive, and a W10, i5 (8Gb RAM) with
SSD, both USB3.
DESCRIPTION
Frame Buffering (in slower computers)
SharpCap uses memory buffers in the camera to save frames when the recording
slows down. This works on relatively slower machines (e.g. W7 without
SSD). The frame rate may look OK at the start of the recording, but
then the buffer will start filling up (Buffer activity is shown on screen).
If the system speed for the recording is on the limit, these frames
will be written to disk during the capture. If not, then the buffers
will fill up resulting in frames lost. The frame buffer in the camera
will write the frame it has into the file at the end of the recording,
but the recording might have lost some frames.
Its important (in the opinion of the writer) to select record settings
where the buffers are not used in occultation timing (or only
minimally).
File size
There may be occasions when the file size is a consideration.
Some file sizes are listed here are at 10 fps. ("SER16" means
SER + 12/16-bit ). The data rate will influence how hard the computer
has to work, so its a guide to setting up. GB = GigaByte
At 10fps:
1920 x 1200 SER16 - 2.7 GB/min
960 x 600 SER16 - 0.68 GB/min
640 x 480 SER16 - 0.36 GB/min
1920 x 1200 SER16 (bin2x2) - 0.67 GB/min
960 x 600 SER16 (bin2x2) - 0.17 GB/min
640 x 480 SER16 (bin2x2) - 0.09 GB/min
Fast frame AVI
800x600 25fps 0.68 GB/min
800x600 30fps 0.80 GB/min
800x600 100fps 2.7 GB/min
How to select settings
A W10 computer with solid state drive (SSD) is recommended, but the
concept of "how fast can it go" only becomes relevant at frame
rates faster than 20 fps. (Asteroid Occultations are recorded between
20 and 2 fps and typically between 10 and 3 fps). The maximum frame
rate I have achieved with W10 SSD is 400fps, using a small AOI and 8bit
depth.
Suggested starting points:
I use 3 fps and Maximum frame size 1920x1200 to find the star
field, using 16bit (bin2x2)
I then select one of these (suggested) capture settings for the event:...
AVI 800 x 600, 25 to 100 fps (Update: AVI is not recommended with SharpCap.
There are problem with the frame rate see below.)
SER 16bit 960 x 600 (bin2x2)
FITS 16bit 960 x 600 (bin as needed)
ADV 16bit 960 x 600 (bin as needed) - i use full frame at 10fps no problem.
ADV has some advantages over SER.
Expose between 50ms and 330ms (20 and 3 fps)
Gain 300 to 450
USB traffic = 0 to 3
Offset = 10 to 50 (take the value from the histogram)
Note (Feb 19) AVI works, but frame rates other-than
25 or 30fps, may cause the analysis software to miss-understand the
actual frame rate and throw a warning. This can often be ignored, so
long as the start or end frame time are added manually. I have been
informed that the Virtual Dub can be used to change the frame rate to
that which was used, and the AVI saved with Laragrith Lossless compression
IN MORE DETAIL
Installation
1) Install SharpCap
(SC)
2) Install the camera driver "QHY5IIISeries Driver" ver 191203win7
or W10. I used both drivers from the QHYdownload
area. The versions supplied on the CD were older.
Note: The CD doesn't play if it the wrong way up! There
is no label.
Power for the camera
USB3 (ca 900 mA) is enough to power the camera and GPS. Cooling will
need the 12v supply. From room temp down to zero Celsius takes about
1 amp (dT ca 20 deg), so a TRACER 4AH battery would be sufficient for
a short observing run.
Camera Settings
There are some default settings for the camera (in SC), and these were
changed to create a working file for occultations. Many settings files
can be saved, but i tend to use a few only and adjust the settings on
the night according to the observing conditions. The camera setting
are saved in a file with the recording.
File Type: FITS, SER, AVI
- I have defaulted to SER (bin2x2) but I have settings for all three
file types. Regarding FITS - this is a good scientific format. If cadence
is short a lot of files will be generated so I reserve this file type
for cadence of 200ms and longer, and for ProAm (ESO Lucy-Star projects)
If Limovie is to be the analytical tool, I use AVI format. (Frame rate
must be corrected with VitualDub 2).
BITS
I use 16 BIT with binning (2x2). On the whole (2x2) gives improved detection
limits, but be careful as the pixel size is then 11.8 um. Best to experiment
with your telescopic system under the prevailing sky conditions and
plate scale. My C11 at F6.3 gives 1.4arcsec/pix at 2x2 (0.7 at 1x1)
which is a good match to typical seeing conditions.
CAPTURE AREA (AOI)
The maximum frame size is 1920 x 1200 which is good for identifying
star fields. For data collection (depending on the instrument focal
length and computer speed ) i use 960 x 600 toachieve higher frame rates
(100 fps without dropped frames )
OUTPUT FORMAT
Use whatever is appropriate, SER is a good starting point.
EXPOSURE
100 to 200ms is a good starting point. A
rule of thumb says that the exposure should be 1/10th the maximum occultation
duration. By adjusting the AOI, bit depth and binning, one can record
at 25 and 50 fps on a USB3 port. (.. and faster).
GAIN
Maximum gain is 480, but i tend to use something a bit lower
if i can (320-380).. At full gain and short exposure (e.g. 100ms) the
IMX174 has a horizontal noise pattern in 2x2 bin mode. While this may
not effect analysis, it can be suppressed in software or in the analysis
method. If SharpCap is Licensed (Pro version) this makes the banding
suppression tool available.
While increasing the gain to a high value make the star
more visible, the bit depth is reduced, and to make used of 12/16bit
mode an intermediate gain value should be considered. Now since i like
to see the star clearly, a gain of 320-380 is about right for occultations.
For Deep Sky Imaging i use full frame 1x1, Gain =180,
Temp=-10, Banding suppession OFF, Exposure 30 or 60sec
AMP NOISE REDUCTION
This is at default ON
OFFSET
Look at the histogram and select an offset value so that none of the
black points are cut off. Mine is set at 150.
USB TRAFFIC
An odd setting that seems to effect the data rate at high cadence. The
default is 50. I have set this to zero for maximum data rate. However
the SharpCap forum shows that the optimum USB traffic (for occultations)
is the range 1 to 5 with other factors coming into play. Zero is needed
at 100 or 200fps
GPS CONTROLS
Show data is set to ON. This displays a window with information about
the GPS reception. The GPS antenna must attached to the camera. If GPS
is set to Off, the computer time is displayed. In SC menu item settings,
check "Log all QHY GPS data to file"
Note: that under some conditions (fewer satellites?) that
GPS status says "Locked" but the actual time is in error by
2 to 3 seconds. BEST to wait at least 15min before using the camera,
and check time against a second clock. Usually there is no problem -
beware of Murphy. The 2 second offset is not exact and cannot be assumed
if a timing has been made. This is most noticeable with lunar occultations.
Since 1 year, there has been no delay in getting UTC.
GPS CALIBRATION LED
Should be set to OFF. I don't recommend using these fine adjust settings
for routine observations. This is done automaticlly by SharpCap 4.1
to +/1 ms
There is a more in-depth review here: http://www.iota-es.de/qhy174gps_workshop.html
and thisYouTube presentationLED
QHY174gpsTiming
CALIBRATION DETAIL
Five factors effect the time calibration. For the best timing
(e.g Lunar Occultations) its preferable to prepare your most frequent
conditions and carry out a calibration with the LED. The settings effecting
the calibration are: Binning + Capture Area Height + 8/16bit
+ USB-Traffic + Exposure Time
(Update: Later version of SC 4.1.... do the calibration
automatically when the settings are changed.)
ERROR STATUS: "BadCalibrationReduceEndPos"
in the GPS log - when no GPS time is displayed. (Update - this
status is redundant)
This error status is the result that under certain circumstances, the
camera reports a good GPS lock but delivers the same timestamp for every
single frame. SharpCap now detects this condition and reports it as
"BadCalibrationReduceEndPos"
The problem seems to happen when the calibration end position is too
high* – the simple solution is to reduce the end position until
the error goes away. Unfortunately SharpCap's auto calibration calculation
is only approximate and sometimes end up picking a calibration end position
that triggers this situation, meaning that the manual adjustment is
required. ( Robin Glover -Personal communication)
* This might occur if a set of conditions are read
in from a file, and the conditions are changed such that the calibration
end positron throws this error.
One example was SER settings changed to AVI
IMAGE CONTROLS
These are left at default Gamma =1, Brightness = 0, Contrast = 0, Timestamp
Frames ON
THERMAL CONTROLS
Will help reduce hot pixels. I don't use cooling in winter to -10C for
occultations. In summer I might set this to zero degrees.
PREPROCESSING
I've not used darks or flats for occultation work.
OTHER CONTROLS
Check the settings area, but the foregoing is used for capture and is
saved in a file for each observation.
Comparison
of QHY and WAT910HX by camera Flash
Two cameras were set up side by side pointing at a wall both with GPS
locked. The WAT was running at 20ms exposure and the QHY at 10ms. Analysis
with Tangra and Limovie showed no time difference after camera delays
were taken into account. The flash gun had an exposure of 1ms or shorter.
In this test, USB trafic = 0. This has also been check via Lunar Occultations.
The auto calibration in SC 4.1 is being used.
A GPS flash unit also confirms GPS and UT Camera sync
to +/- 5ms
SUMMARY
PROS:
If you are happy with WAT-910HX, then i don't see a compelling
reason to go digital. The WATEC is the more sensitive detector.
However ; CMOS offers finer exposure control over video, and greater
bit-depth. (Update in 2026, CMOS now as sensitive as video)
CMOS has larger frame size.
For professional collaborations, the QHY with its 12/16bit FITS file
format is preferable to analogue video, so over all it
is a good product and software is being development on the SharpCap
forum. There are more than enough settings to get the camera
to perform at its best for a particular computer system.
The QHY174-GPS was proven to be a good system for recording
asteroid occultations when the SWRI used SkyWatcher 16" goto dobsonans
with this camera to record occultations by TNO 2014 MU69 in
year 2017
CONS:
There is an annoying gray strip at the top of the frame in SER mode.
(Not any more. SharpCap fixed it)
Horizontal noise pattern at high gain. (Avoid high gain)
Lower sensitivity compared to WAT910-HX (Yes, about 0.5 mag difference)
An alternative it to follow developments in the https://groups.io/g/d-vti-cam
group and perhaps modify your own CCD camera if you are that way inclined.
Tim Haymes
Oxfordshire, England. 2020 February (Updated in 2026 July)
affiliations: BAA, IOTA-ES.
Further reading:
Occultations: http://www.asteroidoccultation.com/observations/NA/
IOTA-ES : http://www.iota-es.de/
QHY174-GPS review: http://www.iota-es.de/JOA/JOA2018_2.pdf
QHY174-GPS early review (Planoccult lists): pdf
SWRI.edu and MU69 occultation predictions
and camera settings
SWRI.edu and MU69 Occ test image
taken with a QHY174m in March of 2017. Target g'= 12.6, frame limit
15.5, exposure 500ms (406mm F4.4)
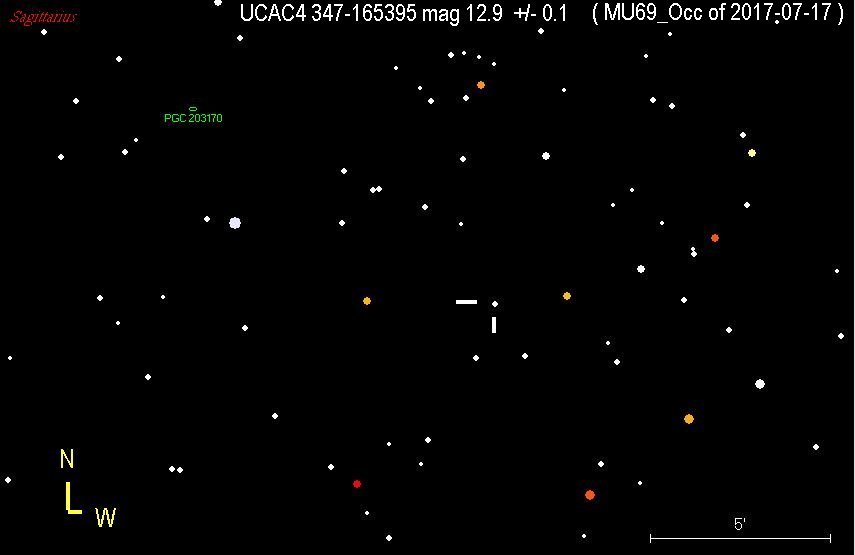
Finder chart for the MU69 occultation of 2017-07-17SkyMapPro
Joan Dunham (IOTA) - preparing a computer for occultations:
pdf
|